Distortions correction
Correction de déformations

& Didier Leboutte

Here is the stereo example used in this tutorial. Many thanks to Wojtek for his picture !
Voici l'exemple stereo utilisé dans ce tutoriel. Grands mercis à Wojtek pour sa photo !
StoneLightX.png (9M)
StoneLightX.jpg (643K)

1) Open the stereo
1) Ouvrir la stereo

Open AnaBuilder, and drag & drop the image file to open it. You should get a stereo anaglyph in AnaBuilder's main panel.
Ouvrir AnaBuilder, et tirer & lacher le fichier image pour l'ouvrir. Vous devez obtenir une stereo anaglyphe dans le panneau principal d'AnaBuilder.

2) Viewing the distortion
2) Voir la déformation

Since the left/right shift is a bit large, make a first manual adjustment by clicking 5 times on the "fast to the right" button (RightBut.jpg ). Then, use autofit tool to adjust the stereo, setting the stereo window on a mean value. If autofit tool does not provide with a good result on your image, you will be obliged to set it manually, but here is all the problem : it is hard to properly decide  of all basic corrections together with possible complex distortions ! But, on this example, it should work. You should then get a result where all basic corrections were calculated by AnaBuilder at best : position, rotation, scale. The quality of this automatic adjustment is the key of all the following, otherwise complex distorsions will still be mixed with basic adjustment, and it would be much more hard to fix !
Comme le décalage gauche/droite est un peu grand, faites un premier ajustement manuel en cliquant 5 fois sur le bouton "rapide à droite" (RightBut.jpg ). Ensuite, utilisez l'outil autofit pour ajuster la stereo, en positionnant la fenêtre stereo à une valeur moyenne. Si l'outil autofit ne donne pas un bon résultat sur votre image, vous devrez le faire manuellement, mais là est tout le problème : il est difficile de décider proprement des corrections de base conjointement aux possibles déformations complexes ! Mais, sur cette exemple, cela doit fonctionner. Vous devez alors obtenir un résultat où toutes les corrections de base ont été calculées par AnaBuilder au mieux : position, rotation, échelle. La qualité de ce premier ajustement automatique est la clef de toute la suite, autrement les déformations complexes seront encore mélangées aux ajustements de base, et seraient beaucoup plus difficiles à corriger.
AutofitMenu.jpg
AdjustedFirstScreen.jpg


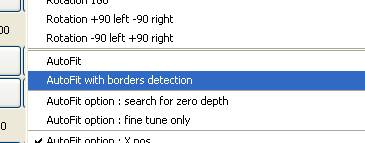
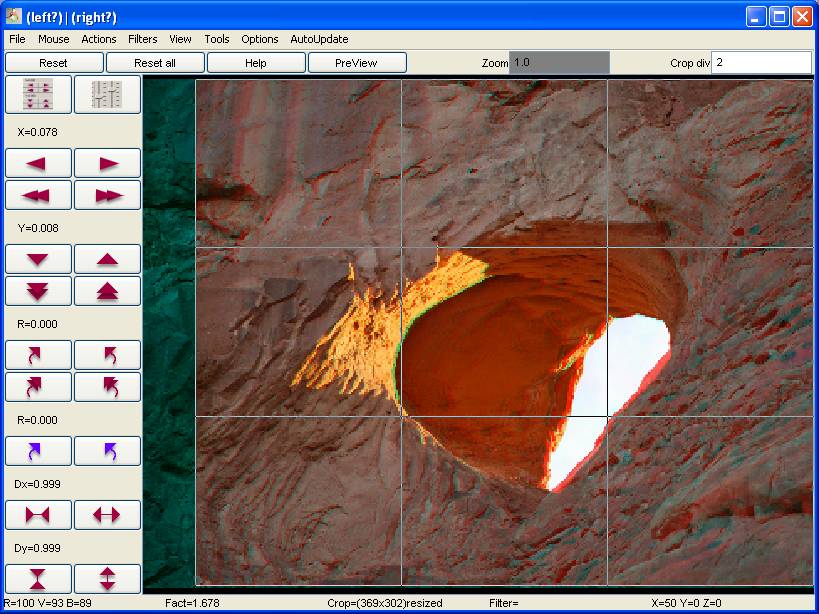
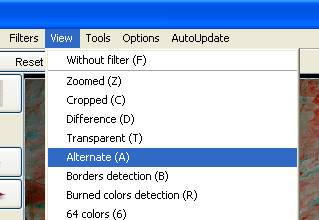
Turn viewing mode to "alternate", using the "view" menu or simply key "A". You should get left and right view continuously switching together. Looking at this alternance, you should view that the stones are not moving properly from left to right, but seem to breath like lungs (see arrows). There is an horizontal dilatation to corret.
Passer en mode de visualisation alternée, en utilisant le menu "Visualisations" ou simplement avec la touche "A". Vous devez obtenir la vue gauche et droite alternant continuellement. En regardant cette alternance, vous devez voir que les pierres ne bougent pas correctement de gauche à droite, mais semblent respirer comme des poumons (voir les flèches). Il y a une dilatation horizontale à corriger.
AlternateMenu.jpg
AlternateFirst.gif

3) Dilatation correction
3) Corriger la dilatation

Now begin the hard work, with a lot of human appreciation. Tune Dx value by clicking on "dilatation" buttons (DilateBut.jpg ), or use equivalent sliders (changing the the sliders panel with button SlidersBut.jpg ). You should appreciate when the stones get back they horizontal solid behavior, dealing with possible stereo shifts. Try to look from a far point of vue to better appreciate the whole sensation. It seems to me that the good point is reached for Dx=0.983.
Maintenant commence le travail difficile, avec beaucoup d'appréciation humaine. Régler la valeur Dx en cliquant sur les boutons "dilatation" (DilateBut.jpg ), ou utilisez les glissières équivalente (en passant au panneau des glissières avec le bouton SlidersBut.jpg ). Vous devez apprécier quand les pierres reprennent les comportement horizontal solide, en composant avec les décalages stereos. Essayez de regarder depuis un point de vue éloigné pour avec une meilleure sensation d'ensemble. Il me semble que le bon point est atteint pour Dx=0.983.
AlternateAdjustDil.gif

Remark : in this treatment you can ask to save the stereo as wobble gif with a high alternating speed to better appreciate (don't forget to ask for "resize at saving" with smaller size in Preferences, to go faster). Then, visualize the wobble with your internet browser.
Remarque : dans ce traitement vous pouvez demander à sauver la stereo comme wobble gif avec une grand vitesse d'alternance pour mieux apprécier (ne pas oublier de demander "redimensionner à la sauvegarde" avec une taille plus petite dans les Préférences pour aller plus vite). Ensuite, visualiser le wobble avec votre navigateur internet.

4) Viewing the trapezoidal distortion
4) Voir la déformation trapezoidale

Click 2 times on the "move right" button (SmallRightBut.jpg ) to adjust the stereo window on the top left of the scene (X=0.081). If you look at the result, the stones still seem to breath a little. But now, there is like a diagonal pixel sliding. It is more sensible at top left than on the middle. It's more visible on a fast wobble gif. On this example, this is a very light sliding, an other example, more evident, will be presented in a next tutorial.
Clickez 2 fois sur le bouton "déplacement droit" (SmallRightBut.jpg ) pour ajuster la fenêtre stereo en haut à gauche de la scene (X=0.081). Si vous regardez le résultat, les pierres semblent toujours respirer un peu. Mais maintenant, il y a comme un glissement diagonal des pixels. C'est plus sensible en haut à gauche qu'au milieu. C'est plus visible sur un wobble gif rapide. Sur cet exemple, c'est un glissement très léger, un autre exemple, plus évident, sera présenté dans un prochain tutoriel.
AlternateTrap.gif


5) Trapezoidal correction
5) Correction trapezoidal

Open the trapezoidal filter panel. Then, slowly adjust together the "Trap X right %" and "Trap Y right %" values to reduce the pixel sliding and improve the impression that the stones are solid : just rotating, keeping their consitency. It seems to me that the good point is obtained for X=1.1 and Y=0.6.
Ouvrir le panneau du filtre trapezoidal. Ensuite, ajuster doucement ensemble les valeurs "Trap X droite %" et "Trap Y droite %" pour réduire le glissement de pixels et améliorer l'impression que les pierres sont solides : seulement en rotation, en gardant leur consistance. Il me semble que la bonne position est obtenues pour X=1.1 et Y=0.6.
  TrapMenu.jpg
 TrapPanel.jpg
AlternateAdjustTrap.gif
.
.

6) End
6) Fin

Adujst the final stereo window at your taste, and save. Here is my result..
Ajuster la fenêtre stereo finale à votre goût, et sauvegarder. Voici mon résultat..
FinalX.jpg